How to Paint with Acrylics: Getting Started
If you’re a beginner who is learning to paint, then choosing to paint with acrylics is a great option for you! Acrylic painting is a wonderful skill to learn, and one of the easiest paints to work with if you’re new to the world of painting.
This step-by-step guide will take you through the ten steps you need to get started with painting. We’ll also go over information about clean up, safety, and techniques to make sure you enjoy the whole experience.
At the bottom of this post, you’ll find answers to common questions that beginners have about acrylics. If you have a question that I haven’t already answered, please feel free to drop it in the comments section and I’ll reach out with an answer.
Before we begin
If you want to learn how to paint with acrylics in an easy to follow and convenient format, you’ll love this Acrylic For Beginners: an A-Z guide to your first acrylic masterpiece all-in-one PDF e-book. It includes everything in this post and more, including:
- How to make beautiful blends and strokes (#1 beginner challenge solved)
- Easy paint color (theory) formulas you can use to make your paintings more captivating
- 3 full step by step painting tutorials (paint and sip friendly)
- and more…

Whichever format you choose to get better acquainted with acrylics, you’re on your way to paint some pretty amazing things – and I’m excited for you to begin.
So sit back, grab your favorite drink(optional of course!) and get ready to step into the beautiful, joyful world of painting with acrylics.
Quick Navigation
Quick Reference Acrylics Materials List
The beauty of acrylics is the simplicity of the supplies you need to get started. Here are some of the basics, along with some nice to have.
Must Haves
- Acrylic Paint Set
- Different size brushes
- Palette
- Painting surface
- Water container
Nice-to Haves
Quick Tips and Techniques for Beginners
- Paint in a well lit and ventilated room
- Cover your acrylic paints in an airtight container when not in use
- Buy a color wheel and watch a color theory tutorial.
- When layering, let each layer dry before the next is applied. This will avoid a mishmash of colors.
- Roughly sketch out your painting with a pencil before starting (especially for beginners in acrylic painting).
- Start with the darkest acrylic colors first, then work your wait up to the lightest values in your composition. This method works beautifully with abstract paintings, as the dark colors give an interesting depth with the consequent light colors layered over it.
- Have fun and don’t overthink it!
For more quick and easy acrylic painting tips: check out this post.
Acrylics for beginning: A 10 Step Tutorial to Creating Your First Painting

Step 1 – Get your paint
The first thing you’ll need to do is figure out what paint colors you want to purchase.
If you are an absolute beginner then the wide variety of different colors and brands can be overwhelming.
Fortunately, choosing paint for your first canvas painting is easier than you think.
Acrylic paints come in two grades: professional (or artist) and student quality. (You may also see craft paints in the acrylic section, but you’ll want to avoid those)
The professional quality paints are obviously going to be the best to work with. There will be more colors to choose from, and the pigments will be more vibrant -which will look better once on the canvas.
The downfall is that they’re more expensive than the student-grade ones.
When starting out painting in Acrylics, I would suggest buying just a set of basic colors in student quality. You don’t really need a variety of colors as long as you have all of the primary colors in the set. But since they’re cheaper, you’ll save money while you learn the basics of acrylic painting.
If you already LOVE working with acrylics and want to level up your paints then definitely go pro, it’s worth the extra cost and I know you won’t regret it!
What are good acrylic paint brands?
Liquitex Heavy Body Acrylics is a great brand for beginners and professionals – the paints are creamy and pigments are vibrant. My favorite one to work with is Golden Heavy Body Acrylics, I find them a bit more pigmented, creamier and glide like butter across the canvas.
My Recommendations For a Starter Acrylics Set
Best Price Beginner Set

Best Quality Beginner Set

Step 2 – Choose your brushes
Having a variety of different brushes is important to not only creating beautiful pieces but also learning different acrylic techniques.
Brush size
It’s best to have a mix of big, medium, and small detailing brushes so that you can practice brush strokes with the different sizes.
Just like Acrylic paints come in different grades, brushes do too!
I really like the variety of brushes in this artist quality paint brush set, it comes with large, medium and small detailing brushes, and even has a carrying case and it’s very reasonably priced too!
At a minimum, you’ll need one flat brush, one round brush, and one small thin brush for the fine detail work.
Brush Material
In terms of brush material, I would suggest using synthetic nylon brushes instead of brushes made out of animal hair.
Acrylics can be hard on brushes made out of animal hair especially when it’s soaked in water.
One of the most important things you can do after buying your brushes (and before painting your first painting) is to learn how to properly use each brush type and care for your brushes.
Because your brushes will be the single most important tool you have as an artist.
I really wish acrylic paint brushes would come with a simple paint brush instruction manual because there are a few very important things that every beginner should know when starting out.
My Brush Recommendations
Best Priced Brush Set for Beginners

Best Quality Brush set for Beginners

Optional- Palette knife
Palette knives can be used to replace or complement paint brushes used in Abstract painting. They create very distinct, creamy and modern-looking strokes (compared to brush strokes).
Palette knives can really add some beautiful movement and textures to acrylic paintings (especially when paired with one of the thickening mediums below).
As a beginner, I would just stick to brushes at the beginning of your painting journey. But as your skills improve or you’re wanting to experiment with different techniques, I would definitely recommend trying to paint with a pallet knife.
It’s surprisingly satisfying! It’s a similar feel to icing a cupcake – without any darn calories and sugar!
Step 3 – Get your Palette
You’ll need a surface to grab and mix your paint from. Plastic or other waterproof material works well- since you’ll need some water to clean them afterward.
You may think that a palette isn’t really a MUST when it comes to painting but trust me, you’ll want one to do your color mixing. (Read more about that in my 35 Easy and Awesome tips for Acrylic Beginners post.
I use a plastic palette similar to this one so I can work with a variety of paints all at once.
If you want to minimize cleanup, these disposable paper paint palettes are great! I’ve used them, and makes cleanup happen in a jiffy!
My Reccommendations for Pallets
Best Priced Pallete

Best Quality Palette

Step 4 – Pick your painting Surface
Choosing a surface for acrylic painting is a fun step since there are so many surfaces acrylics can work well on.
Traditionally, most paintings were done on primed canvas that was stretched over a wooden frame with stretcher bars are placed in the back to keep the integrity.
Now you can choose from a variety of surfaces like flat canvas, paper, wood/boards, even rocks, and other natural materials!
Here are some additional tips if choosing a canvas as your surface of choice,
TIP # 1: Choose a pre-primed canvas. It’s basically a canvas that’s been painted (or primed) with gesso and is ready for acrylic paints out of the package. Most of them in art stores are pre-primed but read the label just to make sure.
Gesso is a base for acrylic painting and allows for the paint to glide easier.
TIP #2: Make sure you don’t buy a canvas primed for oil painting – your acrylics won’t adhere properly to it.
If you’re learning with acrylics, I these canvas boards are a good option. They’re cheaper than stretched canvas so you can practice your techniques and save some money! These canvas boards can even be framed for display later on!
My Recommendations for Painting Surfaces
Cheapest Option

Highest Quality Option

Step 5 – Get your water container.
You can use a big cup or container of water to clean your brushes when changing colors and also to dilute your paint and moisten brushes for easier application.
Expert tip:
An even better approach is to use 2 cups of water.
- 1 cup of water to rinse your brushes with once you’re done with color
- 1 cup to dilute the paint and moisten brushes when you need it
Once the water does become “murky” rinse out the cup and fill up with clean water. It’s also a good idea to keep a paper towel on hand for dabbing away excess water.
Step 6 – Get an easel (Optional)
Although you don’t need an easel as a beginner, it can be very useful when you want to paint upright.
The benefit of an easel is that it props your canvas up as an angle which HUGELY helps with perspective, composition, and proportions.
When working with a painting I often walk far away from the easel to take a look at my painting to make sure I’m happy with the progress.
I also flip it upside down on the easel to get a different perspective. It’s harder to do this when your canvas in laying flat on a table.
Easels come in a variety of sizes and shapes. You can get a tabletop one (you often see these being used at Paint Nite events), or you can get a floor easel.
I really like this convertible easel which converts from floor easel to tabletop easel, so you get the best of both worlds!

Step 7- Deciding What to paint
Now that we’ve covered the painting supplies you’ll need, you are going to need to pick an idea of what to paint.
It seems like an easy enough task, but I find it’s often the most challenging one, especially when you’re just beginning.
Consider the Difficulty Level
First off, you want to pick something that’s not too hard. If it’s too challenging, you might get frustrated and not enjoy the process, which is not want I want for you!
Choosing the right difficulty level of painting is important so that you enjoy the process and feel empowered to learn and paint more!
Try a Guided Tutorial
For some easy painting idea on what to paint, I’ve curated a list just for you: 40+ Easy Canvas Painting Ideas. Most of the ideas on the list have text or video tutorials.
If you have never painted before, you may want to choose a guided video tutorial as your first painting so that you can get a feel for the process.
I have a Library of Free Acrylic Painting Video Tutorials available for you on my Youtube Channel.
A few of my most popular ideas for your first painting


What to Paint: Ideas for freestyle painting without a tutorial
If tutorials aren’t your thing, here are some more ideas. Using day-to day-life as inspiration:
- flower from your garden
- vase of flowers
- your favorite indoor plant
- a bowl of fruit (or individual fruits)
- simple landscape
- your favorite trinkets
- still life objects you have at home (cups, bowls, bottles, etc.)
- beach scene
- garden scene
- sunset scene
- easy acrylic painting ideas
- Easy Acrylic painting idea: lilac bush
If you’re painting without a tutorial, make sure you read through the “Planning the Layout” section below before you get started.
Planning Your Painting’s Layout – Advanced
If you’ve decided on a painting to get you started, then you might be tempted to jump right in and start adding paint onto your canvas.
But taking an extra step before beginning painting can help your painting look more beautiful and pleasing to the eye.
The detailed work you do won’t matter if you’ve set yourself up for failure right from the beginning.
It will also add to your confidence with acrylics and compositions in general!
It’s a simple enough trick or guideline but unfortunately is often forgotten about, and sometimes not even taught in art classes!
This trick can also be applied to photography, to capture more interesting pictures!
What’s the trick?
It’s called “the rule of the thirds.”

If you’re painting a subject matter (flowers, landscapes, a bowl of fruit, etc), using the “rule of the thirds” roughly sketch your layout with a pencil, before beginning painting.
This will guide you better as the painting progresses and everything will stay in proper proportion.
If you’re doing abstract art, just keep the rule of the third in mind, and use it at the end to add some focal areas in the right places.
Step 8 – Troubleshooting your Painting
There might be a time when you’re creating your acrylic painting when something doesn’t feel quite right.
And many of the times, you just can’t pinpoint what’s bugging you because you have been looking at your painting with the same perspective.
Your eyes can’t “see” what is going amiss, especially if you’ve been at it for a long time.
The best tip to overcome this: make it a habit to step away from your painting multiple times as your painting progresses.
TIP: Stand away from your painting and analyze it as you would looking at some art in a museum.
Analyze your paintings from afar
Seeing your painting from a distance gives your eyes and brain a different perspective and you end up seeing more, as strange as it sounds. It can often help you figure out what is bugging you about your art piece.
Another tip is to leave the room, do something else for 5 minutes or so and then come back. This will give you a “fresh set of eyes”.
Flip your painting upside down.
It sounds weird, but trust me, it works!
My husband finds it amusing when I pace back and forth and flip my painting upside down, but its totally worth it! This technique has saved many of my paintings and my sanity!
Step 9 – Sealing your Painting
Once you’re done with your painting, an option is to seal it (especially if you are selling your paintings). Sealing it will protect your painting from the environment around it and protect the paints & pigments from UV light- which can yellow over time.
You can use an inexpensive varnish-like Liquitex Gloss Varnish.

While oil paints can make some gorgeous pieces of art, working with them is a bit higher maintenance compared to acrylic paints.
Step 10 – Clean Up
In terms of brush clean up after you’re done with your acrylic paints, wash your brushes with warm water and gentle soap. That’s it!
Also, as a word of caution: avoid letting acrylic paints dry on your brushes. If they do dry on, you’ll need solvents to take off the dried paint – take it from someone who’s been there -it’s not fun!
You can also use soap and water to wash your painting pallet. If it’s already dried on, try peeling it off – or you can just leave it. If it doesn’t bug you, it won’t affect
Using Acrylic Paint Safely
Acrylics are generally very safe to use, but some pigments can be toxic if not properly handled.
Also, just to put things in perspective, pigments are more concentrated in professional-level paints and lesser in student quality ones.
- The pigments to be aware of are:
- Cadmium pigments
- Cobalt color pigments
- Phthalo Blue and Green
- Umber pigments
Regardless of the pigment, here are some safe ways to handle any type of paint, so that you’re in the habit of using them properly:
- Wash hands thoroughly with water and soap after use
- Avoid eating/drink while painting
- Keep paint out of eyes, mouth, and lungs
- Use eye protection if your doing something like splatter painting

As with all art material, keep paints away from small children. Young students should be monitored and taught safe handling techniques.
If you’re looking for safe acrylics for kids, please check for the “Approved Product” seal on the paint bottles.
Finding the Joy in Painting – A Self-Care Approach
When you first learn painting in acrylics, as with learning any new skill, it can seem intimidating. And sometimes when things don’t turn out according to plan, it can get a bit disheartening.
Your paintings might not turn out the way you think they will the first few times.
This is to be expected!
My advice, from someone whose been there, DON’T GIVE UP! Keep practicing with different techniques, follow some free youtube acrylic painting tutorials, or invest in an online or in-person acrylics painting class (they are so worth it).
If I gave up years ago when I was first learning, I would have never found the joy that comes with painting with acrylics.
Learning how to paint has given me an incredible skill that I have applied in different ways and different times in life. It has been both my therapy as it has my creative outlet.
My wish for you is to find the same joy with painting.
Practice Self-Compassion With Your Inner Artist
Another lesson learned is: don’t be too hard on yourself and your work! We tend to be our own worst critics, I know I’ve been guilty of that, the good news is this can be changed!
All it takes is a perspective change (just like when troubleshooting your acrylic painting above). If you can do that, you’ll find the act of painting(or anything in life) much more enjoyable.
Here’s a trick…
Instead of beating yourself up because your art doesn’t look anything like you had hoped, shift your focus to the big picture instead:
You’re a brave soul to be learning and practicing a brand new skill, that a lot of people are scared, or don’t make time to learn.
Pat yourself on the back and be proud of every second you spend exploring new enjoyments, experiences and taking the time to invest in yourself.
Are acrylic Paints the Best Option for Beginners?
Before answering this question (which I’ll do below), let’s compare Acrylics with the other main types of paints.
Watercolor vs Acrylic Paint
It’s a common misconception that watercolor paint is the easiest for beginners and that Acrylics are reserved for the skilled and seasoned artist.
Actually the opposite is true! Acrylics are much easier for beginners.
While watercolor and acrylic paints share similarities ( both water-soluble and easy cleanup), painting in watercolor can be very technical, with a steeper learning curve with both the pigment and the amounts of water being used.
Some watercolor teachers even recommend their students take a couple of classes on acrylics before jumping right into Watercolor!
Acrylic paint vs Oil Paint
Oil Paint is a very popular paint chosen by professionals. But if you’ve ever worked with oil paint, you know that its definitely a bit of a trickier paint.
Fortunately, you can get a very similar result using Acrylic.
But just in case you aren’t completely convinced, let’s go over some the differences between oil paint vs acrylic painting.
Acrylic Paint
- Can be thinned with water
- Dries within minutes
- Clean up with water
- Minimal Odor
- Can use a synthetic brush
Oil Paint
- Must use solvent or a thinner
- Can take 3-6 months to fully dry
- Clean up with solvent
- Strong odor
- Must use natural brushes
Also to note:
Acrylic Paints can be transformed into translucent (watercolor-like)by diluting it with water or used in a creamy opaque consistency like oil paints.
Acrylic paints can be mixed together to create different colors/tints/shades, much like oil paints.
You can use oil paint over (dried) acrylic paint, but you can’t paint acrylic over oil paints.
Acrylic paints are less expensive than oil paints!
Just for Fun
Can you tell which painting below is painted with Oil paints and which one is painted with acrylic paints?


Answer: It’s hard to tell isn’t it? Both paints share opaque qualities (the opposite of “see-through”) and can be used to paint similar subject matter.
You probably still want to know which is which, right?
I gotcha!
The first picture (the winter scene with the cabin and winding road) is painted with oil paints. The second painting (the mountain scene ) is painted with acrylics.
After personally working with all 3 paint mediums, I really believe that acrylic paints are the best choice for beginners.
That’s not to say watercolor and oils paints shouldn’t be attempted for beginners, they just have a slightly steeper learning curve for different reasons.
Frequently Asked Questions about Acrylic Painting
Q: What are acrylic paints made of?
A: Acrylic paints are a fast-drying paint that’s made with pigment that’s mixed in a polymer medium- the same stuff plastic is made from.
Q: Are acrylic paints water based?
A: Yes, acrylics are water-based and therefore water-soluble – I.e. can be thinned and cleaned with water. But once they are dry, they become water-resistant and the texture of soft pliable plastic. Acrylic paints can be used on canvas, wood, paper, boards, rocks, and other materials.
Q: How long does acrylic paint take to dry?
A: It depends on the thickness of the paint. A thin layer of acrylic dries in a matter of a minute or two, while thicker strokes of paint can take a few additional minutes.
But nothing like oil paintings were it can take 3-6 months to completely dry out.
Q: How do I paint over acrylic paint (I.e. an old painting you want to repurpose)?
A: If the painting doesn’t have a lot of texture to it, you can simply paint over it with a coat or two of white Gesso (acrylic primer).
If there’s lots of texture (the painting isn’t flat or smooth to the touch), you might want to sand it down a bit before applying the coats of Gesso.
Also, never paint acrylic over top oil paintings, otherwise, it will peel or flake off.
Acrylic paints are great for beginners. In fact, many artists have classified acrylics as the most “forgiving” of the paints because they are so easy to use.
Q: How do I make my Acrylic Painting Shiny?
A: If you’re trying to get a sheen over your entire painting, read the section above about sealing your painting.
However, if you’re goal is to make one particular part of your painting glossy (ie. when you’re painting a pond), you’ll want to consider adding a medium to your paint.
The simplest way to get that shine is to add a bit of gloss medium to your paint. The medium will thin your paint and increase the dry time.
Paint mediums are not a beginner technique but they are quite simple to use. Acrylic artists have been known to use all kinds of things in their paint (think eggshells and coffee grounds) in order to get a specific texture or lengthen dry time for more workability. If you want to learn more about mediums, I go into a lot of detail in My A-Z Acrylics for Beginners course.
For beginners who want to try out paint mediums for the first time, I would highly recommend Golden’s beginner’s set of Acrylic mediums. I have personally bought this set and love it! It comes with 6 jars of popular mediums for you to try.
Q: Can I use acrylic paint to paint rocks or other materials?
A. While many tutorials with acrylic paint usually use a canvas or thick paper as a surface to paint on- there is a whole world of other possibilities.
Paint on Water bottles
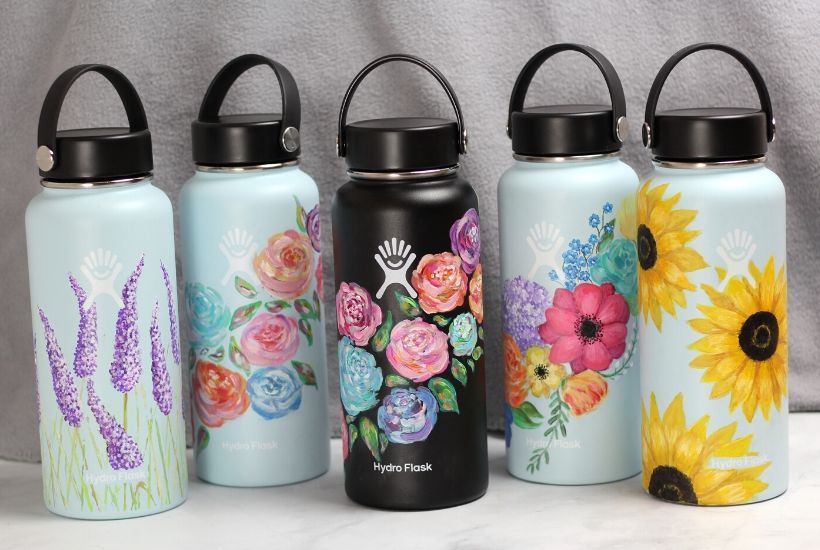
One project I did a few months back was to paint on reusable water bottles. I gave them away as Christmas gifts, but they would also make unique birthday and Mother day gifts too!
The tutorial shows you how to paint on Hydro Flask specific water bottles, but the same steps can be used to paint on many other brands/types.
Paint on Rocks

Another on-trend/popular painting idea is rock painting! From kids, teens, and adults, rock painting is super easy, cheap, and fun!
All you need is a rock/pebble, some acrylic paint, and some inspiration! Check out my comprehensive guide: Rock Painting 101-Ultimate Guide. It will go over all you need to know about rock painting plus 10+ easy designs for adults and kids to get you started.
AND NOW IT’S YOUR TURN…
You’re now well-armed with what you need to know as a beginner in acrylics. I’m going to turn it over to you now.
Your blank canvas awaits…What will you fill it with?
(Just in case you have blank canvas fear, you can check out some of my easy acrylic tutorials here)

P.s. I would love to hear what type of painting you are going to make, feel free to drop a comment below and share your ideas, You might inspire another budding artist!
P.s.s If your dying to learn anything in particular with Acrylic paintings, let me know and I’ll make sure I cover it (either in this post or another).
And until next time, stay nifty and creative!
Jasmine
If you liked this post, please pin it!

Ellie Athay
Thursday 3rd of June 2021
I started with sharpies and alcohol on 3-ply COVID-19 masks after my art major daughter died of cancer just before the pandemic,leaving behind a fairly well equipped studio of sorts. My husband bought a pkg of 48 masks. I was totally at a loss on so many different levels. One night it dawned on me that I could use her myriad sharpies and the 91% alcohol my husband had bought and paint masks. I healed from the inside and my art and masks improved so much that people asked for them. Then on to t-shirts,until I had a rayon one which wouldn’t hold dye (and had a stain). The solution is acrylics with fabric medium. I started with pictures of the tulips and violets in my yard am LOVING it! Thanks for your site!
Angie
Monday 15th of February 2021
Thank you so much for all of the information! I have made several acrylic pours and just recently I’ve decided to get into more detailed work. It’s quite different than what I’m used to but I’m not throwing in the towel just yet. Thanks again!
Jasmine K
Friday 26th of February 2021
Hi Angie,
You are most welcome! I have always wanted to try acrylic pours (planning to try it sometime this year). Glad to hear you are not giving up, it's so worth the effort when things start coming together (which they always do). Keep painting!! Cheers, Jasmine
Jan Hamer
Wednesday 3rd of February 2021
I’ve copied a picture onto a stretched canvas and am using Acrylics as a beginner. Watch this space xx Good luck everyone passing our time on in lockdown Halifax West Yorkshire Feb 2021
Jasmine K
Wednesday 3rd of February 2021
Thank you Jan!! I hope you enjoy making your painting :). Stay safe and well, Jasmine
Dianne
Friday 27th of November 2020
Hi Jasmine, thank you for this informative post. I also recently started painting. This was my first time painting on a large stretched canvas and I discovered some cracking in the paint. Any ideas why or how to fix it? I’m painting abstract and what I did was pour a little strip of the paint directly onto the canvas.
Jasmine K
Tuesday 1st of December 2020
Hi Dianne,
That's great that you started painting! Sorry to hear about the cracking of the paint. That sometimes happens when there is too much moisture in the paint and the excess water breaks down the acrylic binder which then causes the paint not being able to stick onto the surface properly (thus the cracking). The excess moisture could be because of paint that's old and gone bad ( if it smells like old milk, it's bad) or a manufacturers error if its new and you haven't mixed in water to it. To my knowledge you can't fix paint once it gets to that point, so you'll most likely have to try with a new tube of paint. Another time your paint will crack is when doing acrylic pour painting. If this is the case let me know and I can help you further.
Cheers, Jasmine
Bernie
Saturday 24th of October 2020
I do have blank canvas fear.Am trying to get started painting an old barn.Do I paint in the background first and then sketch the barn over that?Thanks for help,Bernie.
Jasmine K
Monday 26th of October 2020
Hi Bernie!
Thanks for reaching out! In terms of how to tackle your composition, there is no right or wrong way. If your background is light enough you can definitely paint it in first then sketch over top of it. But you can also sketch everything out first (on blank canvas), then paint in your background, then barn and other details in foreground. It's a personal preference and which ever makes you most comfortable and confident.
Hope that helps and enjoy making your art! And let me know if you have anymore questions.
Cheers, Jasmine